DEVELOPMENT GUIDE
BUILDING AND DEVELOPMENT WITHOUT GINFRA
IMPORTANT NOTE: While related to the Ginfra core application, it is not required to use WWWHerd. Some modules are used, requiring access to them, but only as libraries. All services can be run stand-alone and instructions will be given on how to do it. That said, a solution fully integrated with the Ginfra app will also be provided (as this is how the first commercial user of this will use it.)
PREREQUISITES FOR BUILDING (any flavor)
NOTE: These instructions are for Ubuntu or Debian, as all testing has been done on those. Once the environment is set up, it should work on any platform (technically even windows since Ginfra partially supports it, but this project does not).
Install Go version 1.24.0 or later.
Install task for go.
go install github.com/go-task/task/v3/cmd/task@latestInstall node.js Note that it requires Node.js version 22.X or later. If your version is earlier, you will need to force an update. (The following will do it for ubuntu/debian.)
sudo apt upgrade
curl -fsSL https://deb.nodesource.com/setup_22.x | sudo -E bash -
sudo apt install nodejs xvfb jq
This also installs the jq command line json processor that is used by some scripts.
SETUP
- Clone wwwherd repo.
git clone https://gitlab.com/ginfra/wwwherd.gitUsegit fetch; git switch -c other/branch origin/other/branch/to use a different branch. cd wwwherd- Clone ginfra repo.
git clone https://gitlab.com/ginfra/ginfra.git - Install package dependencies. This should be run from the repo root:
cd service/
npm install
- Install specific dependencies. This should be run from the repo root:
go run github.com/playwright-community/playwright-go/cmd/playwright@v0.5200.1 install --with-deps
IMPORTANT: sometimes dependency updates will require a change to the playwright version (and more specifically the browser version that playwright has installed). If this happens, you will see errors in the runs saying you need to reinstall playwright. You can do this by running the following in the runner/ directory:
npx playwright install
DEPENDENCIES
Checkout the WWWHerd repo. I typically put my repos in a /build directory, but you can put it anywhere. (I have a year of personal tooling that makes this convenient).
cd /build
git clone https://gitlab.com/ginfra/wwwherd.git
You need to have the Ginfra repo cloned the WWWHerd repo.
cd wwwherd
git clone https://gitlab.com/ginfra/ginfra.git
You need a running postgres server
BUILD
If using the IDEs, they will build for you during the run, but it is a good idea to build manually before running. In the repo root, run the following:
task build_all
Then prep the dev environment with the following script:
bin/prep_dev.sh
FIRST RUN - METHOD #1 - USE PROVIDED SCRIPTS AND CONTAINERS
Build the nats and postgres container.
task docker_dev_nats
task docker_dev_postgres
Start the postgres container.
bin/start_dev_postgres.sh
If you want it to automatically load the Basic Acceptance Test (BAT), run this script instead:
bin/start_dev_postgres_bat.sh
Start the nats container.
bin/start_dev_nats.sh
You can rerun the start_dev_postgres.sh or start_dev_postgres_bat.sh scripts whenever you want to get a fresh database. The NATS service is completely stateless and be left alone in any reset scenario.
FIRST RUN - METHOD #2 - USE OUR DB CONTAINER
You can install postgres however you want, but you can get a container for it be cd'ing into the postgres/ directory and running the following command: task docker If you use this container, there will be a file called /postgres_url in the container that will have the url.
If you are using our container to run the database, run the following script:
bin/redo_db.sh
This assumes the script is on the same machine as the docker host. You may rerun the script at any time to get a fresh database. The only advantage of method #2 over method #1 is if you fork the postgres/ container and make modifications to it.
For NATS, you should do the same step in METHOD #1, since we don't use a seperate container for it.
FIRST RUN - METHOD #3 - BRING YOUR OWN NATS AND DATABASE
IMPORTANT NOTE: if you ever switch to a new database (or even just restart the postgres container provided), you MUST redo these steps.
- You will need a POSTGRES server running somewhere, and you will need the postgres user connect URL. The URL will look something like this:
postgres://postgres:YjkyNDE4ZGJjMjQ1@myaddress.com:5432
- Run the following script:
bin/set_db.sh POSTGRES_URL AAAAAAAA
where POSTGRES_URL is the postgres user connect URL (as mentioned above) and AAAAAAAA just the text 'AAAAAAAA' (it can really be anything, but it has to be something).
- From the repo root directory, build and start the agent with the following commands
cd dispatcher/
go build -v -o build/ginfra_service.exe
build/ginfra_service.exe $PWD
- In another terminal, initialize the database with the following command.
curl -X POST \
  -H "Content-Type: application/json" \
  -H "auth: AAAAAAAAAAAA" \
  -d '{
    "name": "wwwherd"
  }' \
  http://localhost:8900/ginfra/datasource/init
You should see a user named 'wwwherd' and a password in the output.
A file will be created call postgres_user_url in the dispatcher/ directory. The contents will be needed for the next step.
- Run the following script:
bin/set_db.sh POSTGRES_URL POSTGRES_USER_URL
where POSTGRES_URL is the postgres user connect URL (as mentioned above) and POSTGRES_USER_URL is the contents of the file postgres_user_url created in the previous step.
If your NATS server is on the same machine as the wwwherd deployment, you do not have to do anything for NATS. IF it is on a different machine, then you need to change the service discovery url in the working.json configuration file. The following script will do that for you.
bin/set_nats.sh NATS_HOST
FIRST AND SUBSEQUENT RUNS
I use the Jetbrains IDEs, which is how I will describe running it for development below. The following is a typical way to run it for the first time.
You can start these using traditional methods (such as starting the ginfra_service.exe on the command line), but the following is how most of our development is done.
- Start the storage service. For development, you will probably never need to debug the service, so there is no need to run it in an IDE. You can start it on the command line. Cd into the service directory storage/ and run the following:
task build ; ./start_local.sh $PWD
- Start the vite for backend UI. In the repo root, run the following command:
cd server/
npx vite
- Start the api server. With the repo root open into WebStorm, create the following run configuration and start it. IMPORTANT: the service/ directory has been changed to server/.
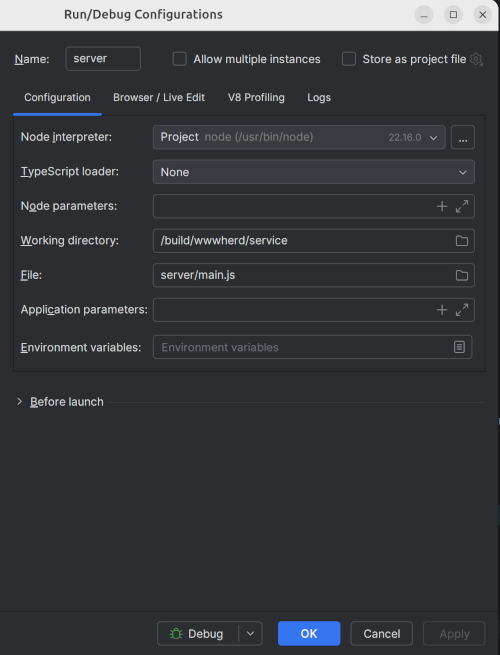
Or you can run it from the command line:
cd server/
task run
- Start the dispatch service. With the repo directory service/ open into Goland, create the following run configuration and start it. IMPORTANT: the service/ directory has been changed to dispatcher/
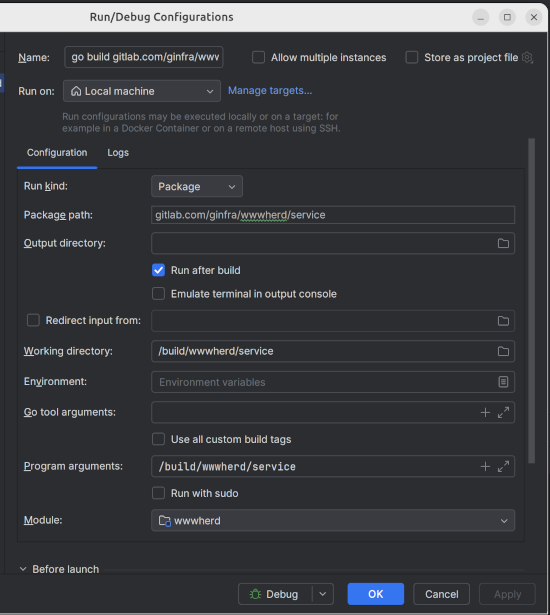
Or you can run it from the command line:
cd dispatcher/
task build ; task run
- Start the runner service. With the repo directory runner/ open into Goland, create the following run configuration and start it.
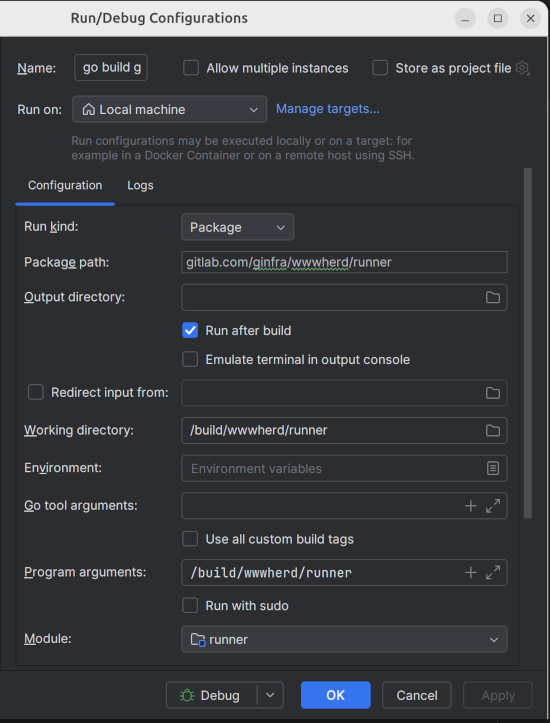
Or you can run it from the command line:
cd runner/
task build ; task run
USING IT
The UI will be available on http://localhost:8000. You can login with the username 'admin' and the password 'aaaaaaaa' (eight 'a' characters).
BUILDING AND DEVELOPMENT WITH GINFRA
This is currently internal cloud development only.